
Getting started
What is TG2AI?
TG2AI is a cloud SaaS Telegram automation platform: multi-account management, messaging, inviters, parsers, growth tools, and more. It ships 55 modular features — each configured and run independently.
No install required
TG2AI is hosted SaaS. You do not deploy servers, Docker, or databases. Buy a license and open the web console.
Highlights
- Multi-account management: bulk import, folders, status monitoring
- Modular architecture: 55 modules, isolated config and runtime
- Enterprise stability: reconnect, FloodWait waits, proxy failover
- Risk controls: delays, randomized content, cool-downs
Step 1: Buy a License
Order entirely inside Telegram — no signup forms.
- Open @tg2ai_official_bot
- Send
/startand pick a plan:
| Plan | Duration | Price |
|---|---|---|
| Monthly | 30 days | $140 |
| Quarterly | 90 days | $350 |
| Yearly | 365 days | $1200 |
| Lifetime | Forever | $2000 |
- The bot creates a USDT-TRC20 checkout (Pay2AI)
- Transfer USDT on the TRC20 network
- After on-chain confirmation, the bot sends your License Key automatically
Payment
USDT-TRC20 only for now (no cards / local wallets). Double-check network and amount on the checkout page.
Free trial
Send /trial in the bot for a 2-hour trial License (once per person) to explore the UI and core features.
Step 2: Sign in
- Open app.tg2ai.com
- Choose License login and paste the key from the bot
- Click Sign in
Other login modes
Admin password and API Key login are also supported. Personal License users should use License Key login.
Dashboard overview
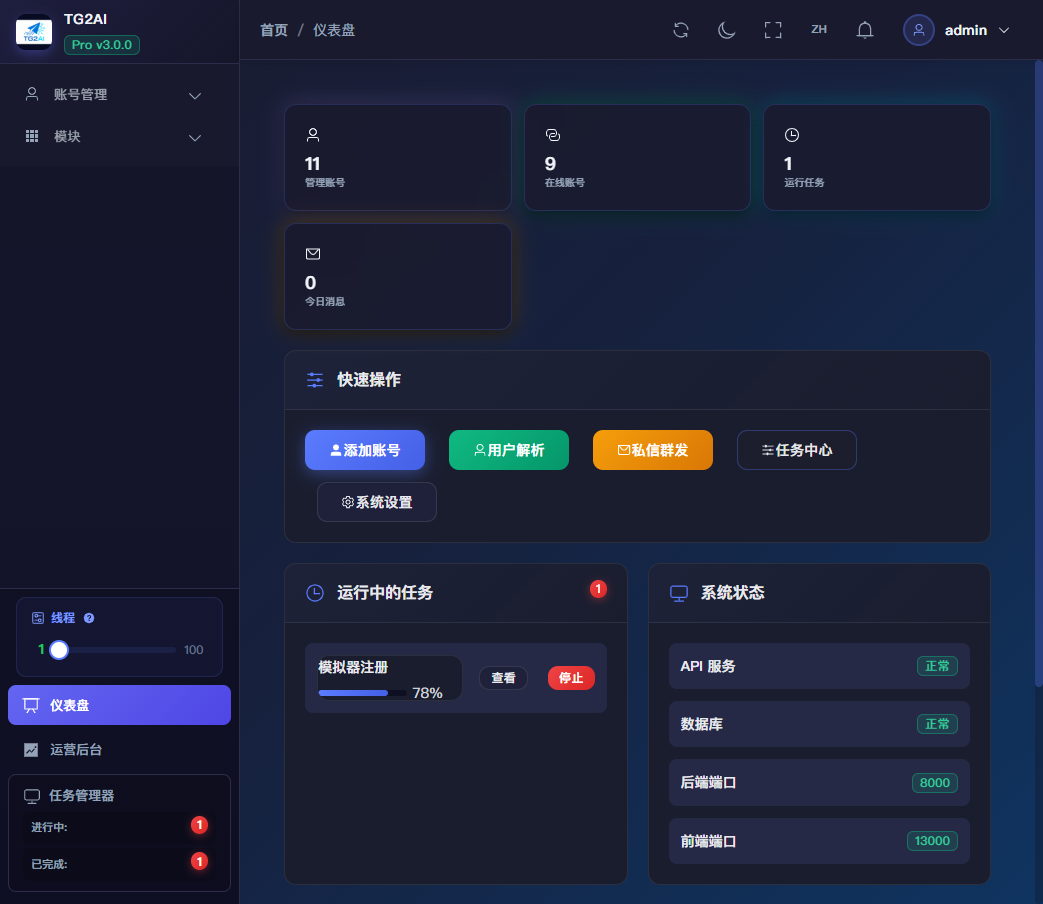
After login you land on the dashboard. Screenshot below is from the live app.tg2ai.com console (TG2AI branding).
| Area | What it is |
|---|---|
| Left nav | Account management, Modules, Dashboard, Admin; thread slider + task manager |
| Top bar | Breadcrumb, refresh, theme, fullscreen, language, notifications, user menu |
| Stat cards | Managed / online accounts, running tasks, today's messages |
| Quick actions | Add account, parsers, DM spam, task center, settings |
| Lower cards | Running tasks, system status (API / DB) |
Add your first account
- Open Account management in the left nav
- Open the Import tab
- Choose Session String, TData, or JSON
- Pick a folder (default: Active) and import
- Confirm the account appears in the list
Proxies
Configure SOCKS5 at import time or per account. See the Chinese Account management guide for full detail while EN docs expand.
New purchased accounts
Warm new numbers before heavy automation to reduce risk.
Next steps
- Module overview — map of all modules
- API reference — HTTP API basics
- Chinese full Wiki: /docs/